
一、实现qemu虚机&宿主机网络互通
qemu虚机的网络介绍及原理可参考前人文章:Linux 内核调试 七:qemu网络配置_lqonlylove的博客-CSDN博客
这里只简单梳理下操作流程,以便快速实现网络互通。
1.宿主机创建 tap0
[root@localhost ~]# ifconfig
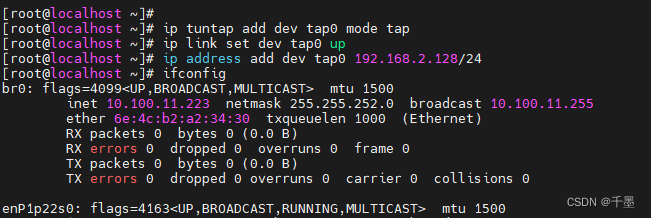
[root@localhost ~]# ip tuntap add dev tap0 mode tap
[root@localhost ~]# ip link set dev tap0 up
[root@localhost ~]# ip address add dev tap0 192.168.2.128/24
[root@localhost ~]# ifconfig
两次ifconfig区别可看出宿主机上新添加的tap0设备,其中tap0的ip已被我们设置。
2.在另一窗口启动qemu虚机,注意带上-net命令
qemu-system-ppc64 -m 8G -smp 4 -name pseries --enable-kvm -boot cd -hda linux.img -serial tcp::4444,server=on,wait=off\
-net nic -net tap,ifname=tap0,script=no,downscript=no
此次我们是手动在宿主机上创建了tap0设备并绑定固定ip,所以qemu启动时网卡的启动脚本和关闭脚本都不用了。
3.虚拟机中配置网络
 # ip addr
 # ip addr add 192.168.2.129/24 dev exxx
 # ip addr
 # ip link set env2 up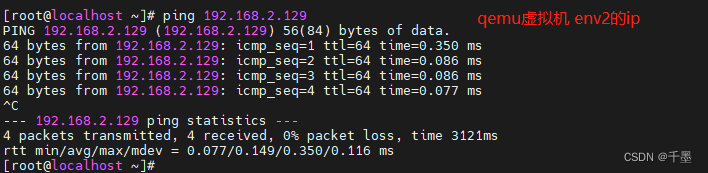
# ping 192.168.2.128 -c 4 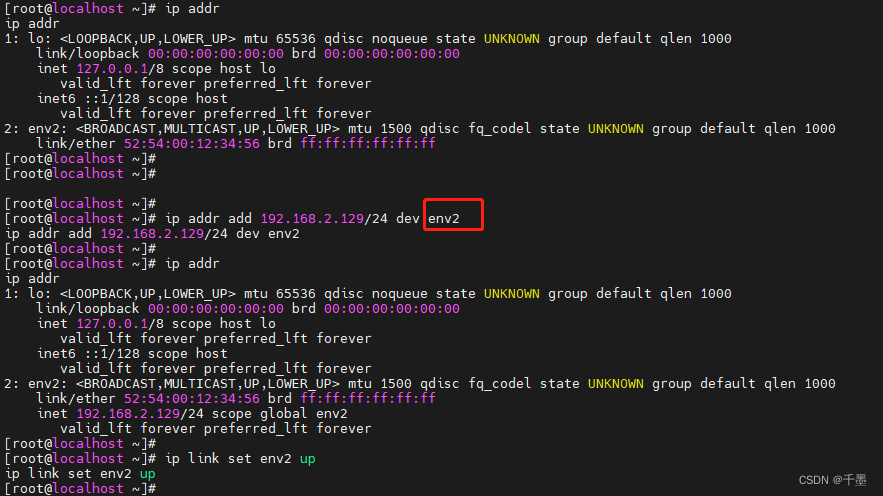

其中的dev设备要换成你自己虚机的设备,我这里是env2。此时可以看到,我们用env2的网卡ping宿主机的tap0,已经可以ping通。
如果此时ping报错Destination Host Unreachable,可以查看物理机是否加载了tap模块,在加载mod模块删除tap0设备并重新上述步骤后,发现可以ping通。


4.将宿主机文件拷贝至qemu虚机
此时,可以 scp root@192.168.2.128:/…… 按照个人需求进行文件拷贝了。

5.宿主机 ping 虚拟机
上述方法实现qemu虚机&宿主机网络互通后,每次guest重启均会丢失相应的env2的配置信息,所以重启后必须重配,嫌麻烦的话可以直接写死到rc.local中,当然也可以通过net的启动脚本script来指定。
二、实现qemu虚拟机访问外网
接上上述步骤,要想让虚拟机继续访问外网则需进一步配置下route以及iptables。
此处参考了Qemu连接外网的配置方法_qemu 使用user联网_Mculover666的博客-CSDN博客
1.宿主机需要开启 IP 转发
echo 1 > /proc/sys/net/ipv4/ip_forward这个选项一般都是默认开的。
2.宿主机添加静态路由
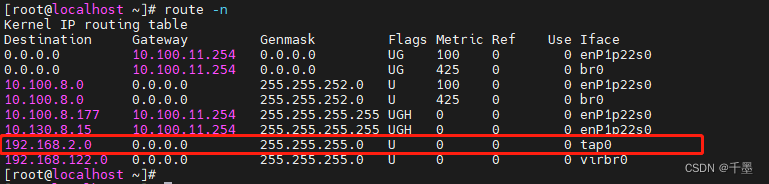
这个路由一般都是有的,没有则需要手动添加:
route add -net 192.168.2.0 netmask 255.255.255.0 dev tap03. 宿主机设置 iptables 规则
打开 iptables 的 NAT 功能:
iptables -t nat -A POSTROUTING -s 192.168.2.0/24 -o enP1p22s0 -j MASQUERADE
这条规则的意思是,来自 192.168.2.0/24,且从 enP1p22s0 出去的包,要进行 NAT,同时会对返回的包进行 NAT。如果只有一个子网, -s 192.168.2.0/24 可以省略。

4.qemu添加默认网关
虚机中添加default gw,即将虚机的网络数据包都交由物理机tap0处理。
route add default gw <宿主机tap0的ip地址> dev exxxroute add default gw 192.168.2.128 dev env2
此刻,ping外网如centos已经成功!可以自由自在的yum install了。^_^
三、附录
1.我用的repo源,需先在/etc/hosts添加上域名解析
18.225.36.18 mirrorlist.centos.org
150.139.241.192 mirrors.aliyun.com
# CentOS-Base.repo
#
# The mirror system uses the connecting IP address of the client and the
# update status of each mirror to pick mirrors that are updated to and
# geographically close to the client.  You should use this for CentOS updates
# unless you are manually picking other mirrors.
#
# If the mirrorlist= does not work for you, as a fall back you can try the
# remarked out baseurl= line instead.
#
#

[base]
name=CentOS-8.5.2111 - Base - mirrors.aliyun.com
baseurl=http://mirrors.aliyun.com/centos-vault/8.5.2111/BaseOS/$basearch/os/
        http://mirrors.aliyuncs.com/centos-vault/8.5.2111/BaseOS/$basearch/os/
        http://mirrors.cloud.aliyuncs.com/centos-vault/8.5.2111/BaseOS/$basearch/os/
gpgcheck=0
enabled=1
gpgkey=http://mirrors.aliyun.com/centos/RPM-GPG-KEY-CentOS-Official

#additional packages that may be useful
[extras]
name=CentOS-8.5.2111 - Extras - mirrors.aliyun.com
baseurl=http://mirrors.aliyun.com/centos-vault/8.5.2111/extras/$basearch/os/
        http://mirrors.aliyuncs.com/centos-vault/8.5.2111/extras/$basearch/os/
        http://mirrors.cloud.aliyuncs.com/centos-vault/8.5.2111/extras/$basearch/os/
gpgcheck=0
enabled=1
gpgkey=http://mirrors.aliyun.com/centos/RPM-GPG-KEY-CentOS-Official

#additional packages that extend functionality of existing packages
[centosplus]
name=CentOS-8.5.2111 - Plus - mirrors.aliyun.com
baseurl=http://mirrors.aliyun.com/centos-vault/8.5.2111/centosplus/$basearch/os/
        http://mirrors.aliyuncs.com/centos-vault/8.5.2111/centosplus/$basearch/os/
        http://mirrors.cloud.aliyuncs.com/centos-vault/8.5.2111/centosplus/$basearch/os/
gpgcheck=0
enabled=1
gpgkey=http://mirrors.aliyun.com/centos/RPM-GPG-KEY-CentOS-Official

[PowerTools]
name=CentOS-8.5.2111 - PowerTools - mirrors.aliyun.com
baseurl=http://mirrors.aliyun.com/centos-vault/8.5.2111/PowerTools/$basearch/os/
        http://mirrors.aliyuncs.com/centos-vault/8.5.2111/PowerTools/$basearch/os/
        http://mirrors.cloud.aliyuncs.com/centos-vault/8.5.2111/PowerTools/$basearch/os/
gpgcheck=0
enabled=1
gpgkey=http://mirrors.aliyun.com/centos/RPM-GPG-KEY-CentOS-Official
[AppStream]
name=CentOS-8.5.2111 - AppStream - mirrors.aliyun.com
baseurl=http://mirrors.aliyun.com/centos-vault/8.5.2111/AppStream/$basearch/os/
        http://mirrors.aliyuncs.com/centos-vault/8.5.2111/AppStream/$basearch/os/
        http://mirrors.cloud.aliyuncs.com/centos-vault/8.5.2111/AppStream/$basearch/os/
gpgcheck=0
enabled=1
gpgkey=http://mirrors.aliyun.com/centos/RPM-GPG-KEY-CentOS-Official

2.虚拟机开机自动设置
在/etc/rc.d/rc.local中添加如下命令,并对该文件chmod +x
ip addr add 192.168.2.129/24 dev env2
ip link set env2 up
route add default gw 192.168.2.128 dev env2
另外额外提一句,若是要修改系统内核参数,可以将/proc/sys/下的内核参数配置添加到 /etc/sysctl.conf中,然后执行 #sysctl -p 让该配置立即生效。
3.qemu支持的网卡类型可以用qemu_system_xxx -net nic,model=help查询,其中-net nic默认以vlan的方式创建,如果不想用默认的网卡创建,比如要创建一张virtio-net-pci类型的网卡,则可以把qemu命令行中的网卡部分换成
-net nic,model=virtio -net tap,ifname=tap0,script=no,downscript=no
其余步骤完全一样,这样就可以用info qtree查看到虚拟有一套virtio的网卡架构了。
如果不想用-net nic这一套hub方式的创建类型,那也可以用传统的 device/xxxdev的方式创建,则可以把qemu命令行中的网卡部分换成
-device e1000,netdev=foo -netdev tap,ifname=tap0,script=no,downscript=no,id=foo


发表评论 取消回复