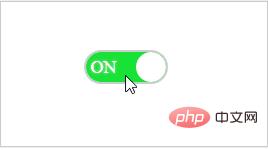
我们先来看下效果图:

(学习视频分享:html视频教程)
html代码:
<html xmlns="http://www.w3.org/1999/xhtml">
<head>
    <title>开关图标</title>
</head>
<body>
    <div>
        <div>
            <input type="checkbox" id="toggle-button" name="switch" οnclick="SwitchClick()" checked>
            <label for="toggle-button">
                <span></span>
                <span class="text on">ON</span>
                <span class="text off">OFF</span>
            </label>
        </div>
    </div>
</body>
</html>
css样式:
<style type="text/css">
        body {
            text-align: center
        }
        .SwitchIcon {
            margin: 200px auto;
        }
        #toggle-button {
            display: none;
        }
        .button-label {
            position: relative;
            display: inline-block;
            width: 80px;
            height: 30px;
            background-color: #ccc;
            box-shadow: #ccc 0px 0px 0px 2px;
            border-radius: 30px;
            overflow: hidden;
        }
        .circle {
            position: absolute;
            top: 0;
            left: 0;
            width: 30px;
            height: 30px;
            border-radius: 50%;
            background-color: #fff;
        }
        .button-label .text {
            line-height: 30px;
            font-size: 18px;
            text-shadow: 0 0 2px #ddd;
        }
        .on {
            color: #fff;
            display: none;
            text-indent: -45px;
        }
        .off {
            color: #fff;
            display: inline-block;
            text-indent: 34px;
        }
        .button-label .circle {
            left: 0;
            transition: all 0.3s;
        }
        #toggle-button:checked + label.button-label .circle {
            left: 50px;
        }
        #toggle-button:checked + label.button-label .on {
            display: inline-block;
        }
        #toggle-button:checked + label.button-label .off {
            display: none;
        }
        #toggle-button:checked + label.button-label {
            background-color: #19e236;
        }
        .div {
            height: 20px;
            width: 30px;
            background: #51ccee;
        }
    </style>
js逻辑:
<script type="text/javascript">
        //窗体加载
        window.onload = function () {
            var onoffswitch = document.getElementById("toggle-button");
            onoffswitch.checked = true;
        }
        //测试开始
        function SwitchClick() {
            var onoffswitch = document.getElementById("toggle-button");
            var label = document.getElementById("batteryIconContent");
            if (onoffswitch.checked) {
                //调用后台
            }
            else {
                //调用后台
            }
        }
    </script>
相关推荐:html教程
以上就是利用前端基础制作html开关图标的详细内容,转载自php中文网


发表评论 取消回复