推荐:html教程
随着对 JavaScript 框架和库的依赖越来越深,很多人对 HTML 的重视程度降低了。这就导致了我们无法充分利用 HTML 的很多功能,这些功能可以大大的增强网站功能。另外通过编写语义化 HTML 可以在网站内容中添加正确的上下文,从而显着改善用户体验。
本文将会介绍一些你可能会忽略的但是很有用的 HTML 标签。
<base>
<base> 标签允许你创建一个场景,其中存在一个基本URL,这个 URL 充当文档中所有相对 URL 的前缀。标签必须有一个包含基本URL的 href 或 target 属性,或者两者兼有。
<!DOCTYPE html>
<html>
<head>
  <base href="https://www.google.com/" target="_blank">
</head>
<body>

<h1>The base element(Google As a case study)</h1>

<p> <a href="gmail">Gmail</a> - Used to send emails; which are messages distributed by electronic means from one computer user to one or more recipients via a network.</p>

<p><a href="hangouts">Hangouts</a> - It's used for Messaging, Voice and Video Calls</p>
</body>
</html>
这样就不必为每个请求重复 URL 的前缀了。
一个 HTML 文档中只能有一个 <base> 元素,并且它必须位于 <head> 元素内。
Image map
image map 是具有特定可点击区域的图片,并且是通过 map 标签定义的。这些区域使用 <area> 标签设置。这使你可以在图像的不同部分中嵌入链接,这些链接可以指向其他页面,对于描述图片中的内容非常有用。
看一个例子:
第一步是像平常一样用 <img> 标签插入图片,但是这次使用 usemap 属性。
<img src="study.jpg" alt="Workplace" usemap="#workmap">
接下来创建一个 <map> 标签,并使用与 img 标签中的 usemap 属性值相同的 name 属性。这会将 <image> 标签与 map 标签链接在一起。
  <map name="workmap">

  </map>
然后开始创建可点击区域。我们需要定义如何绘制每个区域,通常用 shape 和 coords 来绘制。
<area>
<map name="workmap">
  <area shape="rect" coords="255,119,634,373" alt="book" href="book.html">
</map>
用 <area> 元素定义图像上的可点击区域。它添加在 map 元素内。
这些属性包括:
- 在相关区域上绘制矩形时需要使用
shape。你可以使用其他形状,例如矩形、圆形、多边形或默认形状(整个图像) alt用来指定当area元素由于某些原因而无法呈现时要显示的替代文本href包含将可点击区域链接到另一个页面的 URLcoords使用坐标(以像素为单位)精确切出形状。你可以用各种软件来获取图片的确切坐标;下面用 微软的绘图软件作为一个简单的例子。不同的形状以不同的方式表示其坐标,比如矩形用left, top, right, bottom表示。
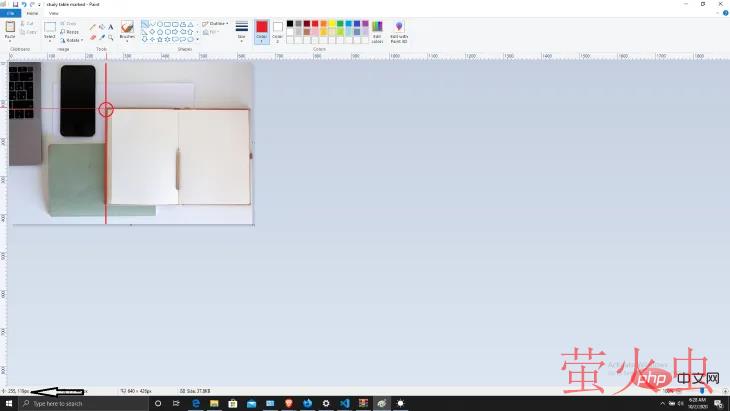
在这里我们有 top, left 坐标:

你可以在图片的左下方读取光标在图片上的坐标,也可以只在水平和垂直面上使用标尺。
下面的截图显示了 right, bottom 坐标:

最终得到:
<img src="study.jpg" alt="Workplace" usemap="#workmap">

<map name="workmap">
  <area shape="rect" coords="255,119,634,373" alt="book" href="book.html">
</map>
也可以使用其他形状,但是每个形状的坐标写法不同。
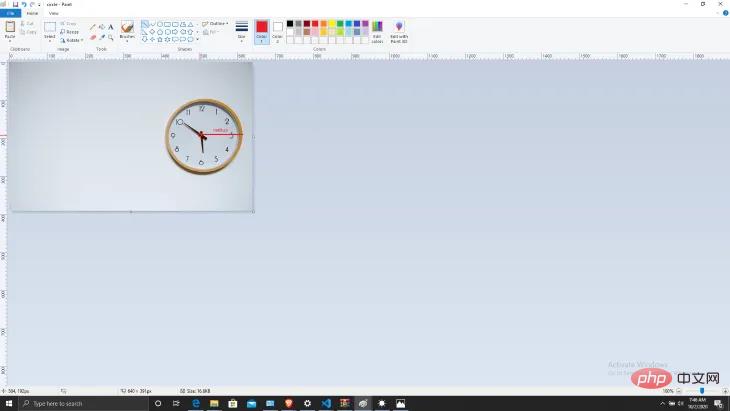
对于 circle,应该有圆心的坐标,然后添加半径:
<map name="workmap">
  <area shape="circle" coords="504,192,504" alt="clock" href="clock.html">
</map>
圆心的坐标同意位于左下角,圆心到末端的水平距离是半径。
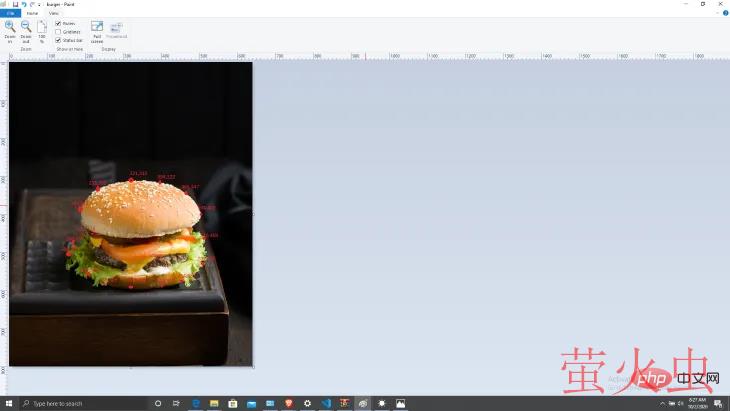
创建一个 poly 更像是徒手画图。你只需链接图像上的不同点,它们就会连接起来:
<map name="workmap">
  <area shape="poly" coords="154,506,168,477,252,429,187,388,235,332,321,310,394,322,465,347,504,402,510,469512,532,454,581,423,585,319,593,255,589,240,536" alt="clock" href="clock.html">
</map>
下面是用 HTML 创建形状时所需要的值:
| 形状 | Coordinates |
|---|---|
| rect | left, top, right, bottom |
| circle | center-x, center-y, radius |
| poly | x1, y1, x2, y2, .…. |
| default | 整个区域 |
<abbr> 和 <dfn>
标签 <dfn> 指定要在父元素中定义的术语。它代表“定义元素”。标签 <dfn> 的父级包含术语的定义或解释,而术语位于 <dfn> 内部。可以这样添加:
<p><dfn title="HyperText Markup Language">HTML</dfn>
  Is the standard markup language for creating web pages.
</p>
也可以与 <abbr> 结合使用:
<!DOCTYPE html>
<html>
<body>

<p><dfn><abbr title="HyperText Markup Language">HTML</abbr></dfn>
  It's the standard markup language for creating web pages.</p>
</body>
</html>
这可以增强可访问性,因为这样编写语义 HTML 可以使阅读器和浏览器在适合用户的上下文中解释页面上的内容。
也可以单独使用 <abbr>:
<abbr title="Cascading Stylesheet">CSS</abbr>
<pre> 和 <code>
预格式化的文本或 <pre> 标签用于在编写文本时显示文本(通常是代码)。它显示所有空格和制表符,并完全按照块中的格式进行设置。
 <pre>
    <code>
      p {
          color: black;
          font-family: Helvetica, sans-serif;
          font-size: 1rem;
      }
    </code>
  </pre>
<fig> 和 <figcaption>
这两个标签通常会一起出现。<figcaption> 用作 <fig> 的标题。
 <fig>
  <img src="https://images.unsplash.com/photo-1600618538034-fc86e9a679aa?ixlib=rb-1.2.1&q=85&fm=jpg&crop=entropy&cs=srgb&ixid=eyJhcHBfaWQiOjE0NTg5fQ">
  <figcaption>basketball<figcaption/>
<fig>
这些标签也可以与代码块、视频和音频一起使用,如下所示。
代码块:
 <figure>
  <pre>
    <code>
      p {
          color: black;
          font-family: Helvetica, sans-serif;
          font-size: 1rem;
      }
    </code>
  </pre>
   <figcaption>The code block</figcaption>
</figure>视频:
 <figure>
 <video src="ex-b.mov"></video>
 <figcaption>Exhibit B. The <cite>Rough Copy</cite> trailer.</figcaption>
</figure>音频:
 <figure>
    <audio controls>
  <source src="audio.ogg" type="audio/ogg">
  <source src="audio.mp3" type="audio/mpeg">
</audio>
  <figcaption>An audio file</figcaption>
</figure>
<details> 和 <summary>
<details> 和 <summary> 用来创建一个可切换的部分。 <summary> 标签位于 <details> 标签内,单击后会自动显示和隐藏的内容。
最好用的地方是你可以用 CSS 去设置它们的样式,即使不依赖 JavaScript 也可以完美地工作。
 <details>
    <summary>
        <span>I am an introvert</span>
    </summary>

    <div>An introvert is a person with qualities of a personality type known as introversion, which means that they feel more comfortable focusing on their inner thoughts and ideas, rather than what's happening externally. They enjoy spending time with just one or two people, rather than large groups or crowds</div>
    <div>
</details>
<cite> 和 <blockquote>
基本上 <blockquote> 是从另一个来源引用的部分。并添加了 <cite> 属性来指示源。
<blockquote cite="https://en.wikipedia.org/wiki/History_of_Nigeria">
The history of Nigeria can be traced to settlers trading across the middle East and Africa as early as 1100 BC. Numerous ancient African civilizations settled in the region that is known today as Nigeria, such as the Kingdom of Nri, the Benin Empire, and the Oyo Empire. Islam reached Nigeria through the Borno Empire between (1068 AD) and Hausa States around (1385 AD) during the 11th century,[1][2][3][4] while Christianity came to Nigeria in the 15th century through Augustinian and Capuchin monks from Portugal. The Songhai Empire also occupied part of the region.[5]
</blockquote>
如果使用 cite 属性,那么这个属性必须是指向源的有效 URL。要获得相应的引文链接,必须相对于元素的节点文档来解析属性的值。有时它们是私有的,例如调用服务器端脚本收集有关网站使用情况的统计信息。
<cite>
cite 元素表示作品或知识产权的标题,例如书籍、文章、论文、诗歌、歌曲等。
<p>The best movie ever made is <cite>The Godfather</cite> by
Francis Ford Coppola . My favorite song is <cite>Monsters You Made</cite> by the Burna boy.</p>
总结
我们应该更多地关注这些标记,并通过编写更多的语义代码来改善网站的功能。
更多编程相关知识,请访问:编程教学!!
以上就是你可能会忽略但有用的 HTML 标签(总结)的详细内容,转载自php中文网


发表评论 取消回复