Linux安装配置nginx+php搭建
文章目录
- Linux安装配置nginx+php搭建
- 1.nginx源码包编译环境和安装相应的依赖
- 1.1 安装编译环境
- 1.2 安装pcre库、zlib库和openssl库
- 2.安装nginx
- 2.1 在[nginx官网](https://nginx.org/en/download.html)上获取源码包并进行下载
- 2.2 进行解压编译
- 3.启动nginx服务
- 3.1 运行nginx
- 3.2 关闭防火墙
- 3.3 用本地浏览器服务虚拟机地址
- 4.修改nginx配置文件创建新的端口页面
- 5.安装php
- 5.1 使用yum安装php-fpm
- 5.2 修改php的配置文件
- 5.3 修改nginx的配置文件
- 5.4 创建php页面文件并查看测试
1.nginx源码包编译环境和安装相应的依赖
1.1 安装编译环境
#安装编译环境
[root@localhost /]# yum install -y gcc gcc-c++
1.2 安装pcre库、zlib库和openssl库
-
pcre(Perl Compatible Regular Expressions)是一个Perl库,是一个用C语言编写的正则表达式的函数库,是轻量级的函数库。nginx的http模块使用pcre来解析正则表达式,所以需要在linux上安装pcre库
-
zlib是一套通用的解压缩开源库,提供了内存(in-memory)压缩和解压函数,能检测解压出来的数据完整性。nginx使用zlib对http包的内容进行gzip,所以需要在linux上安装zlib库。
-
openssl,即open secure sockets layer,是一个开源的安全套接字层的密码库。包括常用的密码加解密算法、常用的密钥算法、证书管理和SSL协议。nginx不仅支持http协议,还支持https(即在ssl协议上传输http),所以需要在linux安装openssl库。
#安装pcre库
[root@localhost /]# yum install -y pcre pcre-devel#安装zlib库
[root@localhost /]# yum install -y zlib zlib-devel#安装openssl库
[root@localhost /]# yum install -y openssl-devel
2.安装nginx
2.1 在nginx官网上获取源码包并进行下载
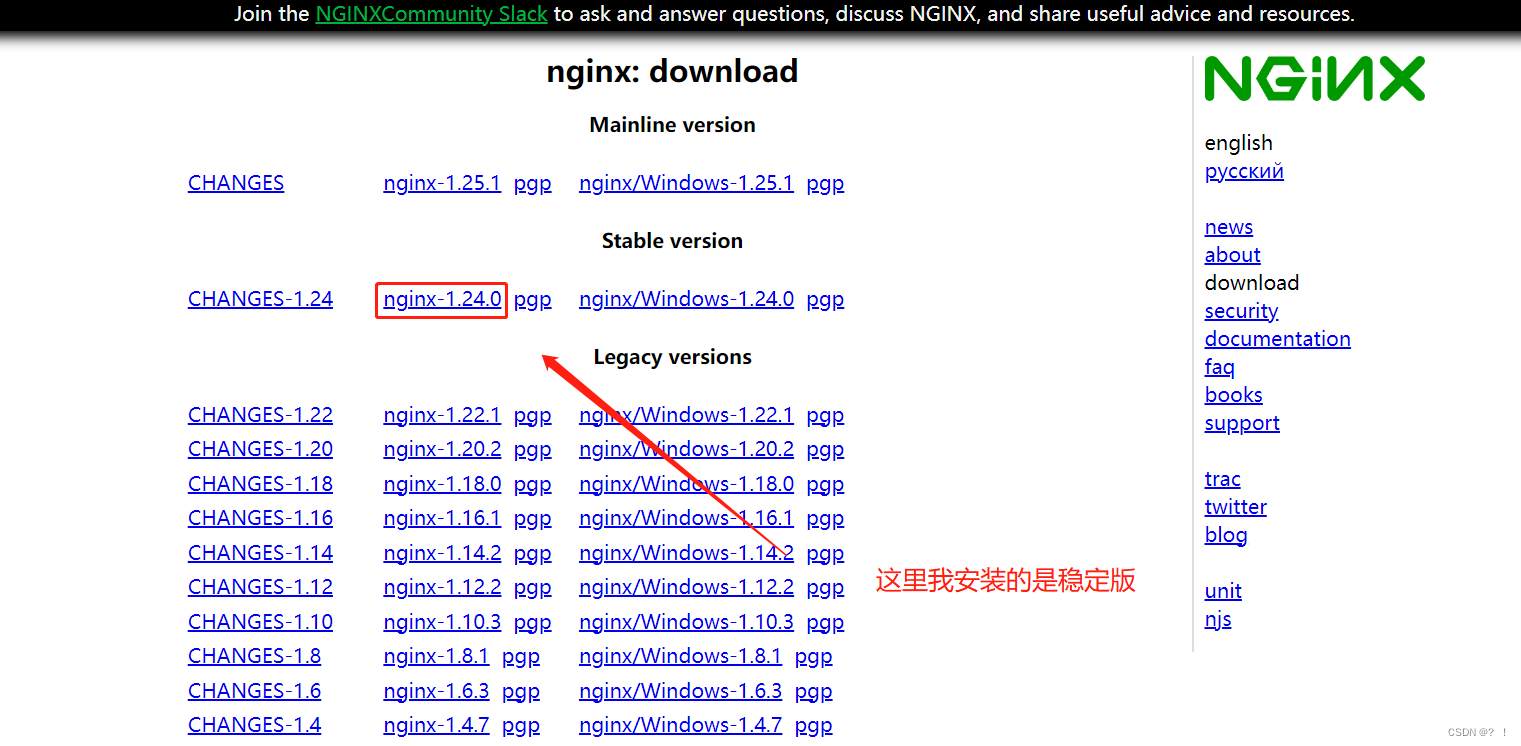
[root@localhost /]# mkdir nginxfile
[root@localhost /]# cd nginxfile/#下载nginx源码包
[root@localhost nginxfile]# wget https://nginx.org/download/nginx-1.24.0.tar.gz
2.2 进行解压编译
#解压源码包
[root@localhost nginxfile]# tar -zxvf nginx-1.24.0.tar.gz#编译配置
[root@localhost nginxfile]# cd nginx-1.24.0/
[root@localhost nginx-1.24.0]# ./configure --with-http_ssl_module
[root@localhost nginx-1.24.0]# ./configure --with-stream
[root@localhost nginx-1.24.0]# ./configure#执行安装
[root@localhost nginx-1.24.0]# make && make install
3.启动nginx服务
3.1 运行nginx
进入到/usr/local/sbin的目录下执行./nginx命令
[root@localhost nginx-1.24.0]# cd /usr/local/nginx/sbin/
[root@localhost sbin]# ls
nginx#执行nginx
[root@localhost sbin]# ./nginx #查看nginx的进程开启情况
[root@localhost sbin]# ps -aux | grep nginx
root       72876  0.0  0.0  34444   384 ?        Ss   21:27   0:00 nginx: master process ./nginx
nobody     72877  0.0  0.2  66624  3932 ?        S    21:27   0:00 nginx: worker process
root       72887  0.0  0.0  12136  1120 pts/2    R+   21:28   0:00 grep --color=auto nginx
3.2 关闭防火墙
关闭防火墙防止本地主机访问时被拦截
[root@localhost sbin]# systemctl stop firewalld.service
[root@localhost sbin]# systemctl status firewalld.service
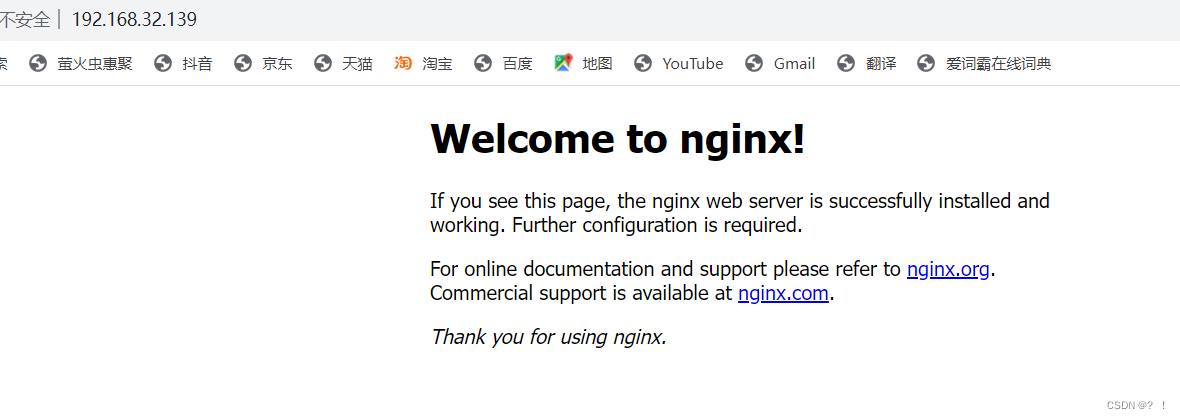
3.3 用本地浏览器服务虚拟机地址
出现welcome to nginx页面代表nginx安装启动完成
4.修改nginx配置文件创建新的端口页面
cd到/usr/local/nginx/html的路径下,创建一个新的后缀为.html的文件
[root@localhost html]# touch web.html#在文件中编写新的网页
[root@localhost html]# vim web.html
<!DOCTYPE html>
<html>
<head>
<title>Hello World</title>
<style>
html { color-scheme: light dark; }
body { width: 35em; margin: 0 auto;
font-family: Tahoma, Verdana, Arial, sans-serif; }
</style>
</head>
<body>
<h1>Hello world</h1>
</body>
</html>
cd到/usr/local/nginx/conf的目录下,修改配置文件,添加以下配置
[root@localhost conf]# vim nginx.conf
    server {
        listen       8080;  #浏览器访问虚拟机的8080端口时显示该页面
        server_name  localhost;        #charset koi8-r;        #access_log  logs/host.access.log  main;        location / {
            root   html;
            index  web.html index.htm; #访问8080端口时定位到web.html文件
        }        #error_page  404              /404.html;        # redirect server error pages to the static page /50x.html
        #
        error_page   500 502 503 504  /50x.html;
        location = /50x.html {
            root   html;
        }

#停止nginx服务
[root@localhost sbin]# cd /usr/local/nginx/sbin/
[root@localhost sbin]# ./nginx -s stop#重新启动nginx服务
[root@localhost sbin]# ./nginx
使用本地浏览器访问8080端口查看新建页面

5.安装php
5.1 使用yum安装php-fpm
#因为源码安装的方式会需要搭载很多的依赖包,安装编译过程也比较的繁琐,所以这里采用yum源安装途径,yum仓库安装的方法比源码包安装更加的简洁快速
[root@localhost /]# yum -y install php-fpm	#启动php-fpm服务
[root@localhost /]# systemctl start php-fpm
[root@localhost /]# systemctl status php-fpm
● php-fpm.service - The PHP FastCGI Process Manager
   Loaded: loaded (/usr/lib/systemd/system/php-fpm.service; disabled; vendor preset:>   Active: active (running) since Tue 2023-08-08 14:29:59 CST; 22s ago
5.2 修改php的配置文件
#定位到php-fpm的文件下
[root@localhost /]# cd /etc/php-fpm.d/#修改www.conf文件内容
[root@localhost php-fpm.d]# vim www.conf
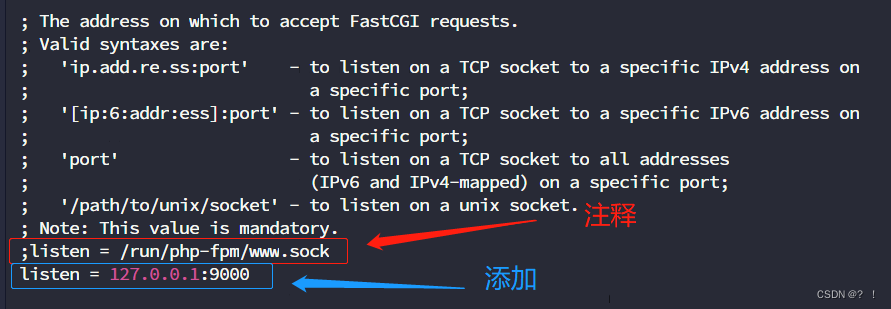
在www.conf文件下注释掉listen = /run/php-fpm/www.sock这段内容,添加listen = 127.0.0.1:9000
5.3 修改nginx的配置文件
#定位到nginx/conf文件下
[root@localhost nginx]# cd /usr/local/nginx/conf/#修改nginx.conf文件内容
[root@localhost conf]# vim nginx.conf
取消掉server中location ~ \.php$内容中的注释
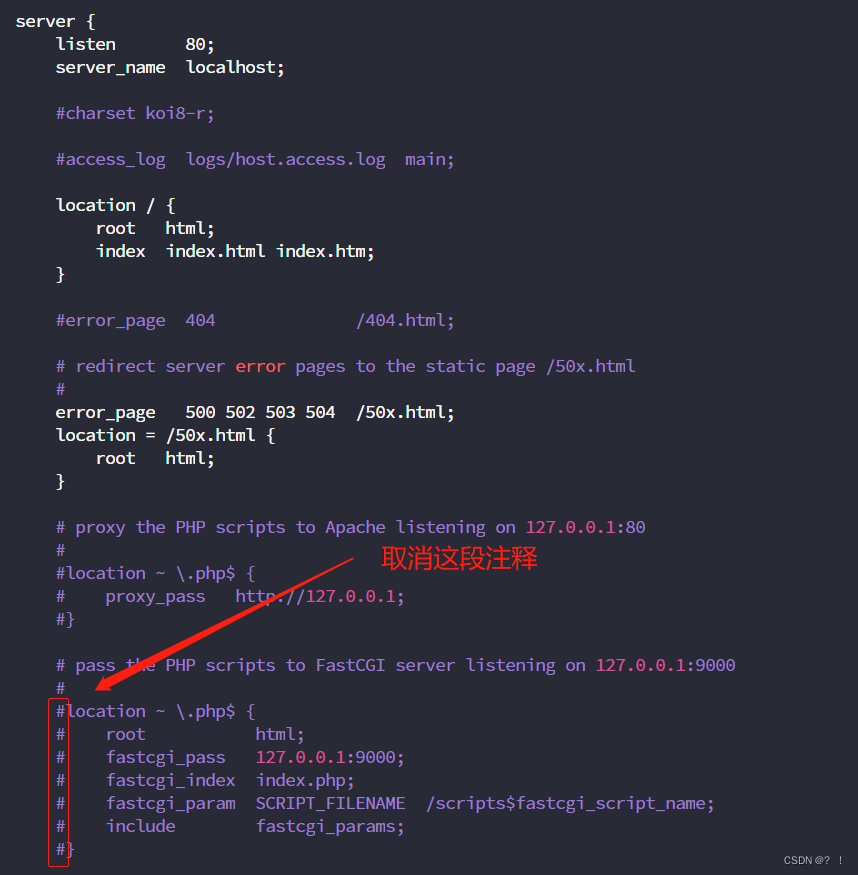
将刚刚取消注释的location ~ \.php$的fastcgi_param SCRIPT_FILENAME内容后面的/scripts$fastcgi_script_name修改为$document_root$fastcgi_script_name

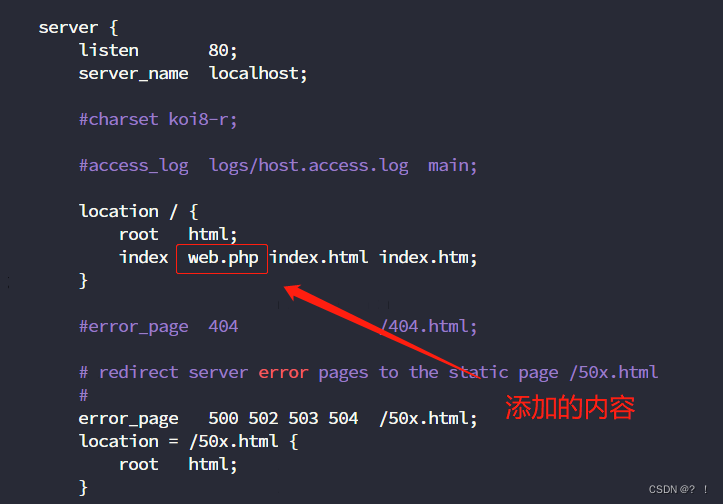
在server的第一段location /内容下的index后面添加web.php文件名(用于定位到后面即将创建的php页面文件)
5.4 创建php页面文件并查看测试
#定位到nginx/html文件下
[root@localhost nginx]# cd /usr/local/nginx/html/#创建web.php页面文件
[root@localhost html]# vim web.php
<?php
phpinfo();
?>
所有的文件配置完毕后需要重启php-fpm服务和nginx
#重启php-fpm服务
[root@localhost html]# systemctl restart php-fpm
[root@localhost html]# systemctl status php-fpm
● php-fpm.service - The PHP FastCGI Process Manager
   Loaded: loaded (/usr/lib/systemd/system/php-fpm.service; disabled; vendor preset:>   Active: active (running) since Tue 2023-08-08 15:02:04 CST; 7s ago
 Main PID: 76438 (php-fpm)

#重启nginx
#定位到nginx/sbin文件路径下
[root@localhost html]# cd /usr/local/nginx/sbin/

#停止nginx
[root@localhost sbin]# ./nginx -s stop
#重新启动nginx
[root@localhost sbin]# ./nginx#查看开启情况
[root@localhost sbin]# ps -aux | grep nginx
root       76473  0.0  0.0  34444   440 ?        Ss   15:03   0:00 nginx: master process ./nginx
nobody     76474  0.0  0.2  66564  4172 ?        S    15:03   0:00 nginx: worker process
root       76503  0.0  0.0  12136  1192 pts/1    R+   15:04   0:00 grep --color=auto nginx
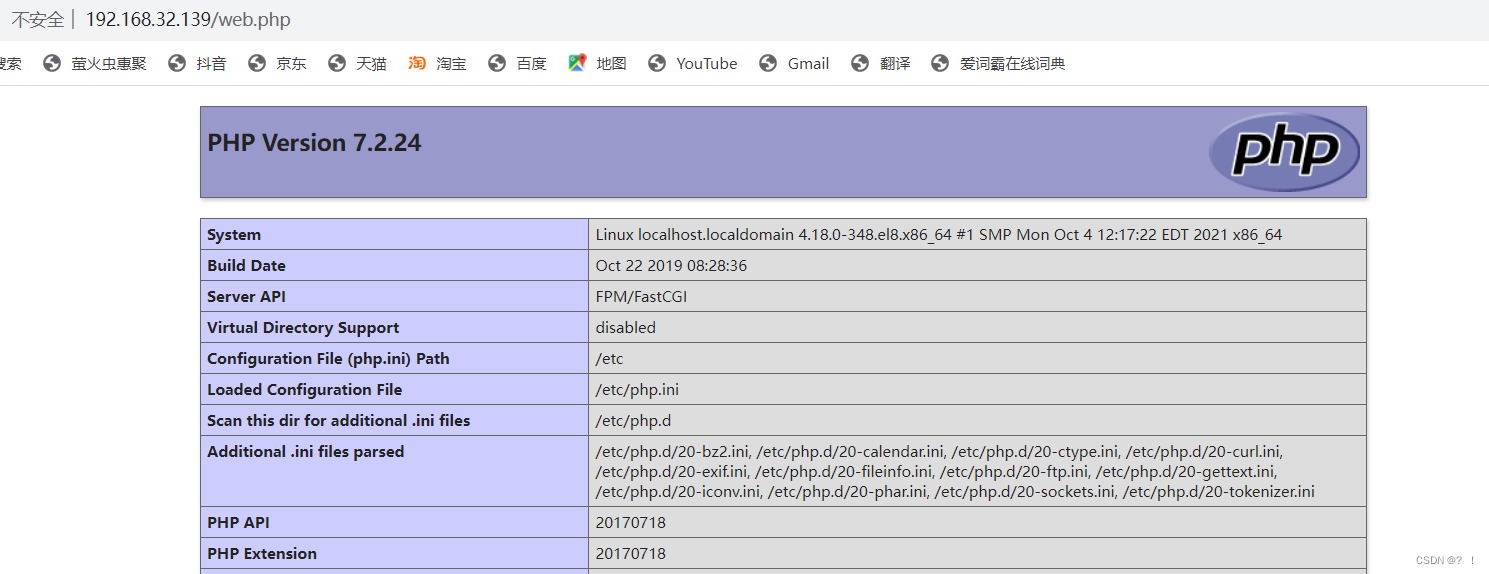
在本地浏览器访问web.php页面
注意:如果访问不成功可以检查一下防火墙是否关闭



发表评论 取消回复